hAP AC Lite (952Ui-5ac2nD):
(Windows):
REQUIRED: PXESERVER To Write Firmware To Mikrotik. ( http://erwan.labalec.fr/tinypxeserver/pxesrv.zip )
- Download Latest Version of BOTH “Factory” And “SysUpgrade” Files For hAP AC Lite.
- Verify that you have install “Tiny PXE Server”.
- Rename the “Factory” File to “rb.elf“.
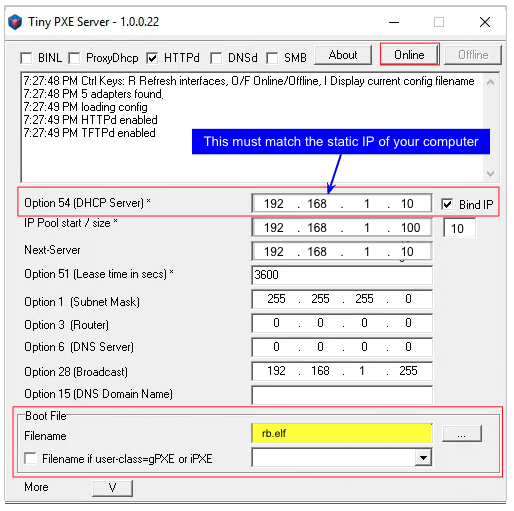
- Set your computer’s Ethernet interface to a static IP address of 192.168.1.10
- See Image Below For Tiny PXE Server Setup.

- Connect your computer’s Ethernet port to port 1 on your MikroTik Router.
- Start your PXE Server Click “Online”
- With the unit powered off, press and hold the reset button on the node while powering on the device. Continue holding the reset button until you see TFTPd: DoReadFile: rb.elf in the Tiny PXE log window.
- Release the node’s reset button and click the Offline button in Tiny PXE. You are finished using Tiny PXE when the elf image has been read by the node.
- The node will now automatically reboot with the temporary AREDN® Administration image.
- Disconnect the Ethernet cable from the WAN port (1) on the Mikrotik and insert it into one of the LAN ports (2,3,4) before you proceed.
- Setup Computer back to DHCP. After booting the elf image the node will have a default IP address of 192.168.1.1.
- In a web browser, open the node’s Administration page
http://192.168.1.1/cgi-bin/admin(user = ‘root’, password = ‘hsmm’) and immediately navigate to the Firmware Update section. Browse to find the sysupgrade bin file you previously downloaded and click the Upload button. - The node will now automatically reboot with the new AREDN® firmware image.


